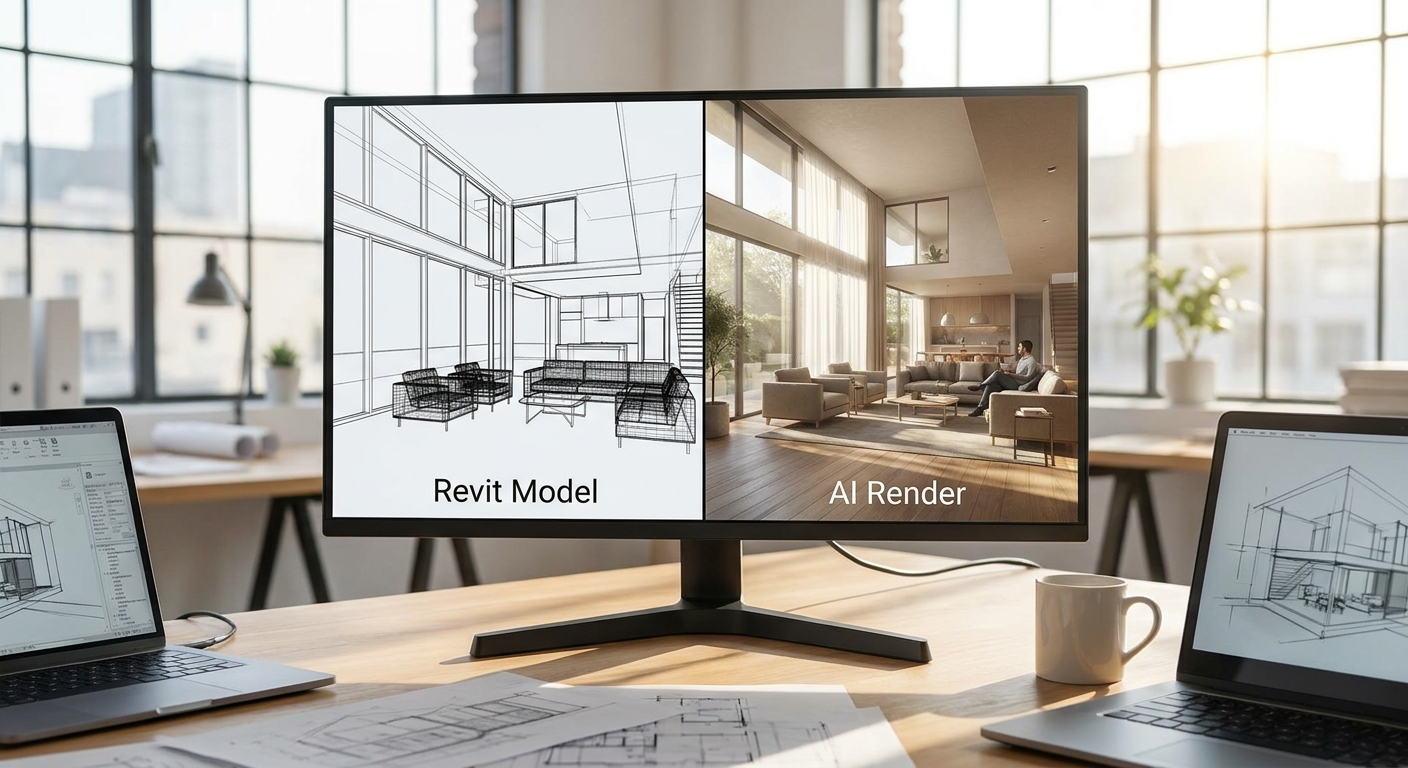
Revit gives you geometry, not atmosphere — turning a Revit view into a client-ready photorealistic image used to mean hours in V-Ray or Enscape. A revit ai render workflow with PromptRender cuts that to three steps: export a screenshot, describe the scene, generate.
- PromptRender converts a Revit screenshot into a photorealistic revit ai render without V-Ray or Enscape setup.
- Export the Revit view at 1920x1080 or higher — low-res screenshots produce blurry, plasticky renders.
- Describe materials, time of day, and lighting in plain text instead of manually mapping materials in Revit.
- Use PromptRender for fast client previews in 2026; keep V-Ray for final marketing stills that need exact material control.
Why this matters
Architects lose entire afternoons rendering a single interior perspective the traditional way — setting up materials, placing lights, waiting on GPU render time. Clients want to see the design today, not next week.
A revit ai render workflow skips the render engine entirely. You're not calculating light bounces or importing HDRIs — you're describing what the space should feel like, and the model does the rendering. That shift matters more in 2026 than it did two years ago, because client review cycles have gotten shorter and design revisions happen mid-meeting, not mid-week.
This isn't a replacement for V-Ray on a final marketing render where every material reflection has to be exact. It's the tool for the 80% of renders that exist to answer one question fast: does this look right?
What you'll need
- A Revit model with the view you want to render already set up
- Revit's Realistic or Shaded with Edges visual style turned on for the export
- A screenshot tool (Windows Snipping Tool or the built-in Print Screen works fine)
- A PromptRender account and at least one render credit
- 5-10 minutes per view, depending on how many prompt iterations you run
The steps
1. Clean up the Revit view before you export
Hide anything that isn't part of the final image: reference planes, construction lines, dimension strings, section markers. Revit exports exactly what's on screen, and PromptRender reads that screenshot as the base geometry — clutter in the view becomes clutter in the render.
Switch the visual style to Realistic or Shaded with Edges rather than Wireframe or Hidden Line. Common mistake: exporting a Hidden Line view and expecting the AI to infer materials that were never visible in the source image.
2. Set the camera angle like a photographer, not a drafter
Use Revit's Camera tool to place a human-eye-level perspective rather than a top-down or isometric view. Set the target height around 5'-6" for interiors and pull the camera back enough that the field of view sits between 35mm and 50mm equivalent — anything wider distorts walls into a fisheye curve.
This matters because the AI renders what it sees in the frame. A camera angle that already looks natural in Revit produces a render that looks natural after generation. A warped angle produces a warped photorealistic image, just with better lighting.
3. Export a high-resolution screenshot
Export or screen-capture the view at 1920x1080 minimum — 2560x1440 if your monitor supports it. Save as PNG to avoid JPEG compression artifacts around window mullions and thin structural lines.
Expected outcome: a clean, full-frame image of the model with no Revit UI, toolbars, or watermarks in the shot. Common mistake: cropping the screenshot to include the Properties panel or Project Browser — that geometry gets interpreted as part of the scene.
“If the render still looks like a wireframe with color, the screenshot resolution is the problem, not the AI.”
4. Upload the screenshot to PromptRender
Drop the exported image into PromptRender. The tool reads the geometry, camera angle, and rough proportions directly from the screenshot — no manual re-modeling, no import/export between file formats.
5. Describe the scene in plain language
This is the step that replaces hours of material and lighting setup in Revit. Write what you'd tell a photographer: "dusk exterior, warm interior lighting spilling through floor-to-ceiling glass, white oak flooring, matte black window frames." Name the materials that matter to the client — concrete, walnut, brushed steel — because vague prompts produce generic finishes.
Mention time of day and weather explicitly. "Overcast midday" and "golden hour" produce noticeably different shadow lengths and color temperature in the output.
6. Pick a render style and generate
Select the render quality or style setting that matches the deliverable — a quick internal review versus a client-facing hero shot. Generation runs in seconds rather than the minutes-to-hours typical of a traditional GPU render pass.
7. Review and iterate on the prompt, not the model
If the first pass gets 80% there, adjust the text description rather than going back into Revit. Swap "warm interior lighting" for "cool daylight, north-facing" and regenerate. Common mistake: re-exporting a new Revit screenshot when the fix only needed a prompt change — that wastes a render credit and a trip back to the model.
8. Export the final image for the client deck
Once the render matches the brief, export at full resolution for the presentation. Keep the original Revit screenshot on file — you'll reuse it if the client asks for a different lighting mood on the same view later.
Turn a Revit view into a render now
Upload a screenshot, describe the scene, generate in seconds.
Troubleshooting
Render looks flat or washed out. The source screenshot resolution was too low or the Revit view was exported at a low zoom level — re-export at 1920x1080 minimum and try again.
Glass looks solid instead of transparent. The prompt didn't name the material explicitly. Add "clear glazing" or "low-iron glass" directly to the scene description.
Perspective looks stretched near the edges. The Revit camera field of view was set too wide. Go back into Revit, narrow the FOV to 35-50mm equivalent, and re-export.
The AI added furniture or landscaping you didn't want. The prompt was too open-ended. Add explicit exclusions — "no furniture, empty room" — to lock the scene down.
Interior lighting looks unrealistic for the time of day stated. The original Revit view was exported in a dark or unlit visual style. Re-export with Realistic visual style active so the base image already shows daylight or artificial light sources.
Render credits running low mid-project. Batch your Revit views before uploading — export every camera angle you need in one Revit session, then run prompts back-to-back instead of round-tripping between Revit and PromptRender for each view.
Tools and resources
- Revit's Camera tool and Realistic visual style for the source export
- A screenshot utility capable of full-resolution capture (Snipping Tool, Print Screen)
- PromptRender for the revit ai render generation step
- A running prompt log — save the exact wording that worked for a given material palette so future views on the same project stay consistent
What to do next
If your studio also works in SketchUp alongside Revit, the workflow barely changes — screenshot, describe, generate. The SketchUp render guide walks through the same three steps for SketchUp exports, including the export settings specific to that software.
FAQ
What is a revit ai render?
A revit ai render is a photorealistic image generated from a Revit screenshot using AI, rather than a traditional render engine like V-Ray or Enscape. PromptRender produces one from an uploaded screenshot and a text description in seconds.
Do I need V-Ray or Enscape installed to use PromptRender with Revit?
No. PromptRender works from a screenshot exported directly out of Revit's Realistic visual style, so no render engine plugin is required. You still need Revit itself to model and frame the view.
What resolution should my Revit screenshot be?
Export at 1920x1080 or higher. Screenshots below that resolution produce blurry edges and washed-out materials in the generated render.
Can PromptRender fix a bad camera angle from Revit?
No. The AI renders the geometry and perspective as captured, so a distorted wide-angle Revit camera produces a distorted render. Fix the field of view in Revit before exporting.
How is a revit ai render different from a traditional Revit rendering?
Traditional Revit rendering calculates light bounces and reflections through a render engine over minutes to hours. A revit ai render generates the finished image from a screenshot and text prompt in seconds, trading exact physical accuracy for speed.
Is PromptRender better than V-Ray for architecture renders in 2026?
For fast client previews and design iteration, PromptRender wins on turnaround. For final marketing stills needing precise material and lighting control, V-Ray or a similar render engine still wins on fidelity.
Can I use the same Revit screenshot for multiple render styles?
Yes. Upload the screenshot once and generate multiple times with different scene descriptions to test lighting moods or material palettes without re-exporting from Revit.
Does PromptRender work with Revit models exported as images from other software too?
Yes. The same screenshot-to-render workflow applies to SketchUp, Rhino, Blender, and ArchiCAD exports, not just Revit.
One last thing
The biggest quality gap between a mediocre revit ai render and a convincing one isn't the AI model — it's the specificity of the Revit screenshot going in. A clean, well-lit, properly framed view with the right visual style turned on will outperform a rushed prompt every time, because the AI is filling in atmosphere, not inventing geometry from nothing. Spend the extra ninety seconds getting the Revit export right in 2026 before you touch the prompt box.